
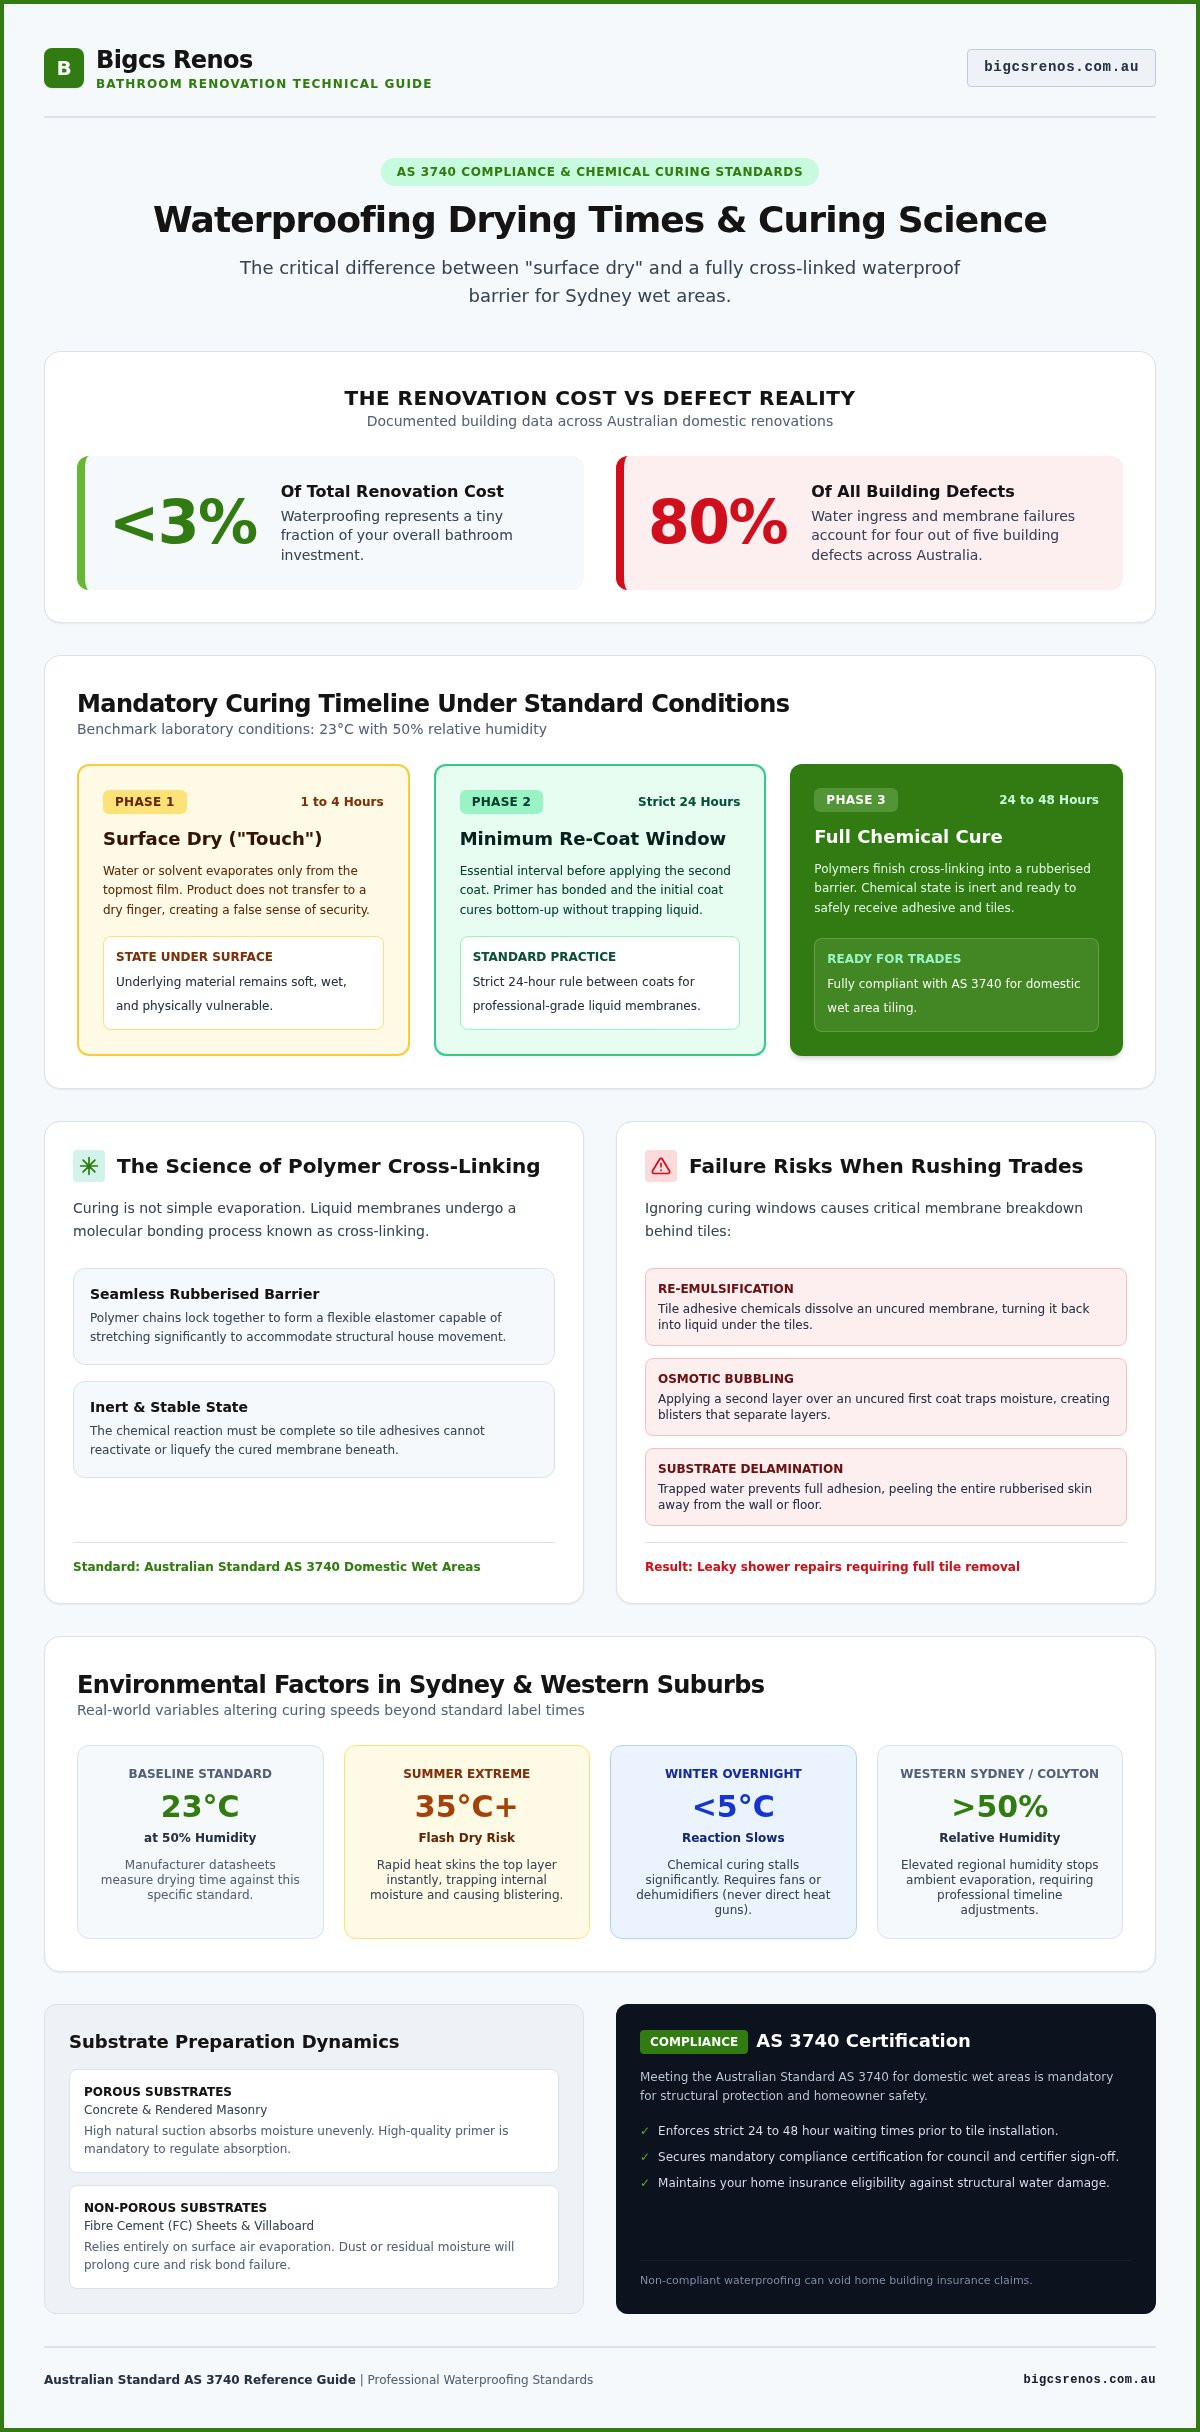
Did you know that while waterproofing represents less than 3% of your total renovation costs, it accounts for a staggering 80% of all building defects across Australia? It is a confronting statistic for any Sydney homeowner, especially when you are standing in a half-finished bathroom wondering exactly how long does waterproofing take to dry before the next trade can start. We understand the frustration of conflicting advice from different tradies and the constant worry that a rushed job today will lead to a costly "leaky shower" repair in a few years.
You deserve a renovation process that is transparent and built to last, rather than one dictated by guesswork or wet weather delays. This article clarifies the critical difference between surface drying and full chemical curing, ensuring your project meets the rigorous AS 3740 standards for domestic wet areas. We will provide a clear timeline for your renovation and explain why respecting the curing process is the ultimate insurance for your home. From understanding atmospheric conditions in Western Sydney to choosing the right membrane, you will gain the confidence to manage your project with precision and professional insight.
Key Takeaways
- Distinguish between surface-level dryness and the deep chemical curing required to prevent structural water damage and future leaks.
- Discover exactly how long does waterproofing take to dry under standard conditions and why waiting the full 24 to 48 hours before tiling is non-negotiable.
- Learn how Sydney’s humidity and temperature swings can speed up or stall your project, requiring expert adjustments to your renovation schedule.
- Identify the visual and physical signs that a membrane is ready for tiling, helping you avoid the "she'll be right" attitude that ruins wet areas.
- Ensure your renovation meets AS 3740 standards to secure your mandatory compliance certification and maintain your home's insurance eligibility.
Understanding Waterproofing Dry Times: Surface Dry vs Fully Cured
When homeowners ask how long does waterproofing take to dry, they are usually looking for a green light to bring in the tilers. However, there is a vital distinction between a surface that is dry to the touch and a membrane that has fully cured. While modern liquid membranes might feel solid within a few hours, the chemical transformation required to protect your home's structure takes significantly longer. Understanding this difference is the first step in ensuring your renovation avoids the common pitfalls of rushed workmanship.
What Does 'Dry to Touch' Actually Mean?
Surface dryness, often achieved within 1 to 4 hours under standard conditions, simply means the water or solvent has evaporated from the top layer. If you press your finger against it, the product won't transfer to your skin. This is often a facade. Beneath that thin skin, the membrane remains soft and vulnerable. Applying a second coat over an uncured first layer traps moisture, which often leads to osmotic bubbling or the entire membrane peeling away from the substrate. Re-coat time is the minimum interval required between layers to ensure the first coat is stable enough to support the next application.
The Science of Curing for Wet Areas
Curing is a sophisticated chemical process called cross-linking. This is where the polymer chains within the liquid membrane bond together to create a seamless, rubberised barrier capable of stretching significantly to accommodate house movement. For this to happen correctly, the membrane must become inert or chemically stable before tile adhesive is applied. If you tile over a membrane that is still curing, the chemicals in the adhesive can interfere with the waterproofing. This can cause re-emulsification, where the membrane effectively turns back into a liquid state beneath your tiles.
Most professional-grade liquid membranes require a strict 24-hour rule between coats. This patience ensures that the primer has done its job, sealing the substrate and allowing the cure to happen from the bottom up rather than just skinning over the top. Rushing this stage is a primary cause of the "leaky shower" syndrome that plagues many Sydney renovations. By allowing the full chemical cure to complete, you are investing in a bathroom that meets AS 3740 standards and remains watertight for decades. Taking the extra time now prevents the heartbreak of pulling up expensive tiles to fix a failed membrane later.
Key Factors That Change How Fast Your Membrane Dries
While product datasheets provide a baseline, they cannot account for the unique environmental variables of a Sydney worksite. Determining exactly how long does waterproofing take to dry requires looking beyond the label and assessing the local conditions of your home. Environmental factors like temperature, humidity, and airflow play a decisive role in whether a membrane cures successfully or fails prematurely.
The Impact of Sydney's Climate on Renovation Timelines
Sydney's weather is notoriously varied. On a 35-degree summer day, the heat can cause a membrane to "flash dry." This is where the surface skins over too quickly, trapping moisture underneath and leading to unsightly surface blistering. Conversely, the standard benchmark for drying times is 23°C with 50% relative humidity. In Western Sydney suburbs like Colyton, where humidity often exceeds these levels, the evaporation process can stall entirely.
Winter renovations present the opposite challenge. When temperatures drop below 5°C overnight, the chemical reaction required for curing slows down significantly. In these conditions, we often recommend using fans or dehumidifiers to maintain consistent airflow. This helps pull moisture away from the surface without the risks associated with direct heat guns. If you are planning a bathroom renovation in these conditions, professional management of the drying environment is essential to keep the project on track.
Substrate Preparation and Its Role in Drying
The material beneath your membrane dictates how much moisture is absorbed and how much must evaporate. Porous substrates, such as concrete or rendered masonry, behave differently than non-porous materials like fibre cement (FC) sheets or villaboard. A dusty or damp substrate will prolong the curing phase and may prevent the membrane from bonding correctly, leading to future delamination.
Correct priming is the solution here. A high-quality primer regulates the "suction" of the substrate, ensuring the waterproofing membrane dries at a uniform rate. Without this step, the substrate might drink up the moisture from the membrane too fast, resulting in a brittle, ineffective barrier. By ensuring the surface is clean, dry, and properly primed, you create the ideal foundation for a membrane that meets AS 3740:2021 standards. This meticulous approach to preparation is what separates a high-end result from a DIY disaster.
Comparing Waterproofing Methods: Liquid vs Sheet Membranes
Choosing the right waterproofing system is a balance between the specific needs of your floor plan and your desired project timeline. For most Sydney homeowners, the central question remains: how long does waterproofing take to dry? The answer varies significantly between liquid-applied systems and pre-formed sheet membranes. While liquid options are favoured for their versatility in tight spaces, sheet membranes offer a different set of advantages for larger, flatter surfaces.
Liquid Applied Membranes: Pros and Cons
Liquid membranes are the industry standard for residential bathrooms across Greater Sydney. Their primary strength lies in their ability to create a completely seamless, elastomeric barrier that contours perfectly to complex floor wastes and wall junctions. This flexibility is essential for meeting the strict requirements of Bathroom Waterproofing standards. The trade-off is the mandatory wait time. Because liquid systems require multiple coats to reach the correct dry film thickness, you must factor in a 24 to 48-hour window before tiling can commence.
To enhance the longevity of these systems, many professionals now recommend epoxy grouting as a secondary line of defence. Unlike standard cementitious grout, epoxy is non-porous and adds an extra layer of protection in high-use shower areas. This combination of a high-quality liquid membrane and epoxy grout provides a robust solution that stands up to the daily demands of a busy family home. It is a meticulous approach that ensures your renovation remains pristine for years.
Sheet Membranes and Torch-On Systems
Sheet membranes represent a more industrial approach to water protection. These systems involve pre-formed rolls of waterproof material that are either glued or heat-welded to the substrate. The most significant advantage is immediate thickness control. There is no risk of the applicator applying the product too thinly. When considering how long does waterproofing take to dry for sheet systems, remember that the bonding agent is the bottleneck, not the membrane itself. The adhesive used to bond the sheet still requires several hours to set before it can handle foot traffic.
These systems are exceptionally effective for large balconies or flat roof areas where speed and uniform coverage are paramount. However, they require expert handling to manage laps and joins correctly. For a typical bathroom renovation in Colyton, liquid membranes are usually the superior choice. The reactive clay soils in Western Sydney cause subtle house movement. A liquid-applied Class III membrane offers the superior elongation needed to bridge these shifts without tearing, provided the applicator respects the necessary curing intervals.
How to Tell If Your Bathroom Waterproofing is Ready for Tiling
Determining if a membrane is ready for the next stage requires more than just a quick glance. While you might be eager to know how long does waterproofing take to dry so you can finish the job, rushing the tilers in can be a recipe for disaster. Understanding how long does waterproofing take to dry is about more than just the clock; it is about the physical state of the material. Most high-quality professional membranes are designed with visual indicators, such as a distinct colour change, to signal they have progressed from liquid application to a solid state. For example, a bright blue membrane might turn a deep navy once the moisture has evaporated.
Beyond colour, the firmness test is essential. You should check the internal corners and wall-to-floor junctions, which are the thickest areas and take the longest to cure. If these spots feel spongy or soft under a firm thumb press, the chemical cross-linking is incomplete. Your tiler’s professional opinion is invaluable here. An experienced tiler will often refuse to lay adhesive over "green" or uncured waterproofing because they know their warranty is at stake.
The Dangers of Tiling Over 'Green' Waterproofing
Tiling over a membrane that hasn't fully cured leads to moisture entrapment. This trapped water has nowhere to go, eventually rotting the substrate or causing the membrane to re-emulsify. This often results in adhesive failure, where tiles begin to "drum" or pop off the floor. Research indicates the average residential insurance claim for internal water damage caused by failed membranes exceeds $30,000, making a 24-hour delay a very small price to pay for long-term security. If you want to avoid these risks, engaging experts in professional waterproofing ensures every wait time is strictly observed.
Flood Testing: The Ultimate Integrity Check
To be absolutely certain of your bathroom’s integrity, a flood test is the gold standard. According to AS 3740:2021, you should wait a minimum of 72 hours after the final coat before filling the area with water. This ensures the membrane is chemically inert and won't be damaged by immersion.
To perform the test, simply plug the floor waste and fill the shower base or balcony with approximately 25 to 50mm of water. Mark the water level on the wall or a tile wedge and leave it for 24 hours. A drop in the level, beyond minor evaporation, indicates a leak that must be addressed before the first tile is laid. This step provides the ultimate peace of mind, confirming that your home is protected against the "leaky shower" syndrome.
Why Professional Waterproofing in Colyton Saves You a Fortune
Entrusting your wet area protection to a seasoned professional is an investment in your home’s structural integrity. While a DIY approach might seem like a way to trim the budget, the complexity of managing a renovation timeline often leads to expensive errors. A specialist understands exactly how long does waterproofing take to dry in the specific context of your project, ensuring that subsequent trades don't compromise the membrane before it reaches full chemical strength. This coordination prevents the common "cowboy" mistakes that result in costly remediation work just a few years down the track.
Our team ensures a seamless synergy between the waterproofing and tiling phases. By managing both trades, we eliminate the conflicting advice that often plagues renovations, ensuring the tile adhesive is only applied once the membrane is chemically inert. This meticulous orchestration is what guarantees a leak-free result that stands the test of time.
Compliance and Certification in NSW
In New South Wales, the legal requirements for wet area work are stringent. Under the Home Building Act 1989, any residential waterproofing where labour and materials exceed $5,000 requires a qualified, licensed contractor. When you work with a professional, you receive a signed Waterproofing Certificate of Compliance. This document confirms the installation meets AS 3740:2021 standards and is essential for your Principal Certifier to sign off at the pre-tile inspection phase.
Without this certificate, your home insurance may be void for future water damage claims. DIY waterproofing is a high-risk gamble that can leave you unprotected. For those seeking comprehensive project management that handles everything from compliance to the final finish, our guide on expert bathroom renovations near me provides deeper insights into navigating these regulatory hurdles and ensuring a successful transformation.
The Bigcs Renos Difference
At Bigcs Renos, we bring over 15 years of industry experience to every project in Colyton and Greater Sydney. We don't just apply a membrane; we monitor environmental factors like suction and humidity to determine precisely how long does waterproofing take to dry for your specific substrate. Our meticulous approach includes the use of Class III high-elongation membranes and the option for epoxy grouting to provide an impenetrable secondary barrier against moisture ingress.
We pride ourselves on transparency and open dialogue, ensuring your original vision is realised without cutting corners on curing times. Our reputation is built on reliability and a passion for the fine details that make a bathroom truly exceptional. If you're ready to start your project with a team that values precision and professional integrity, enquire about your Colyton bathroom renovation today.
Secure Your Bathroom's Future with Professional Precision
Understanding the timeline of your renovation is about more than just managing trades; it is about respecting the science of your home. While the question of how long does waterproofing take to dry often leads to a search for the fastest answer, the real value lies in the 24 to 48-hour chemical cure that ensures a lifetime of protection. By distinguishing between surface dryness and a fully inert membrane, you are choosing quality craftsmanship over a rushed, temporary fix that could lead to costly remediation later.
Ensuring your wet area meets AS 3740 standards is the only way to avoid the heartbreak of future structural defects and insurance denials. At Bigcs Renos, we bring over 15 years of experience to Western Sydney, operating as fully licensed and insured NSW tradies who specialise in leak remediation. We take immense pride in a meticulous approach that never cuts corners on curing times or professional compliance. Ready to transform your space with the confidence of professional certification? Get a Professional Waterproofing Quote from Bigcs Renos today. Let us help you build a bathroom that remains a beautiful, dry sanctuary for your family for years to come.
Frequently Asked Questions
Can I speed up the drying time of my waterproofing?
You can improve the drying environment by using fans or dehumidifiers to increase consistent airflow. Avoid using direct heat guns or industrial heaters as these can cause "flash drying" where the surface skins over too quickly, trapping moisture beneath and leading to blisters. In Colyton's more humid periods, ensuring steady air movement is the safest way to help the membrane cure without compromising its structural integrity or bonding strength.
How many coats of waterproofing are required for a shower?
A minimum of two coats is required to meet AS 3740:2021 standards for internal wet areas. Each coat must be applied at a specific thickness to ensure the final dry film is robust enough to handle house movement. Applying a single thick layer is a common mistake; it is much better to apply two thinner, uniform layers with a full 24-hour curing period between them to achieve a professional result.
What happens if it rains on my outdoor balcony waterproofing?
Rain on an uncured membrane can cause re-emulsification, effectively washing the product away or preventing it from bonding to the substrate. If your Colyton balcony project is caught in a downpour before the membrane has reached its rainproof stage, typically 4 to 8 hours, the entire area usually needs to be cleaned and reapplied. We always monitor local weather forecasts closely to ensure a clear window for application and successful curing.
Can I walk on the waterproofing once it feels dry?
You should avoid walking on the membrane even if it feels dry to the touch. While the surface might be tack-free, the material remains soft and vulnerable to punctures or delamination from the weight of your footsteps. Foot traffic can tear the membrane at critical junctions, leading to the "leaky shower" syndrome. It is best to wait at least 24 hours before any trade access is permitted to the area.
Does the type of tile adhesive affect the waterproofing dry time?
The adhesive itself doesn't change how long does waterproofing take to dry, but applying it too early can trap moisture. If the membrane hasn't fully cured, the solvents or water in the tile adhesive can react with the waterproofing, leading to a bond failure. We recommend using high-quality polymer-modified adhesives only once the membrane is chemically inert to ensure your tiles don't "drum" or pop over time.
Is 24 hours always enough time before tiling?
While 24 hours is a standard benchmark, it is not a universal rule for how long does waterproofing take to dry. Factors such as high humidity in Western Sydney or cold winter temperatures can extend the necessary wait time to 48 hours or more. Before tiling, we perform a physical check for any spongy spots in the corners. Rushing this stage is a primary cause of building defects, so patience is the better investment.
What is the best temperature for applying a liquid membrane?
The ideal temperature for applying liquid membranes is between 10°C and 30°C with moderate humidity. In the peak of a Sydney summer, temperatures exceeding 35°C can cause the product to dry too fast, while winter nights below 5°C can halt the curing process entirely. Our team adjusts application schedules based on the local Colyton climate to ensure the membrane reaches its maximum elongation and long-term durability for your home.
Do I need to waterproof the entire bathroom floor?
Under AS 3740:2021, the entire bathroom floor must be waterproofed if it is made of timber or is on an upper level. For ground-floor concrete slabs, only the shower area and a perimeter "water stop" are technically mandatory, but we strongly recommend waterproofing the full floor. This extra step protects your Colyton property from accidental tub overflows or plumbing failures, providing a much higher level of long-term security and value.


