
What if the most vital part of your new sanctuary isn't the brushed brass tapware or the freestanding bath, but the invisible layers hidden beneath your floor tiles? Most homeowners feel a genuine wave of anxiety when they consider the bathroom renovation process step by step, often dreading the discovery of hidden mould or the nightmare of a failed waterproofing membrane. It's perfectly normal to feel overwhelmed by the complex sequence of plumbers, electricians, and tilers required to bring a high-end vision to life.
We understand that you want more than just a stylish room; you want the peace of mind that comes with structural integrity and meticulous craftsmanship. This guide will strip away the confusion, offering you a masterclass in the complete timeline of a professional renovation. We'll move from the first sledgehammer swing to that final, perfect bead of silicone. You'll discover the critical stages of structural remediation, the latest 2026 standards for lead-free plumbing, and the specialist waterproofing techniques that ensure your investment remains beautiful and leak-proof for decades.
Key Takeaways
- Learn how to set a realistic budget with a 10-15% contingency buffer to handle any hidden structural surprises during the demolition phase.
- Understand the bathroom renovation process step by step to ensure your waterproofing membrane meets strict AS 3740 standards for a leak-proof finish.
- Discover why structural preparation and subfloor inspections are the most critical phases for preventing long-term mould and water damage.
- Master the art of tile layout and epoxy grouting to achieve a premium, low-maintenance aesthetic that stands the test of time.
- Gain confidence in the final fit-off stage, from connecting lead-free tapware to conducting essential pressure tests before the final handover.
Phase 1: Planning, Design, and Legalities
A successful transformation begins long before the first tile is chipped away. Think of this stage as the blueprint for your peace of mind. The renovation process is a complex dance of logistics, and without a solid plan, costs can spiral. When you approach the bathroom renovation process step by step, your first priority is a realistic budget. In the 2026 Australian market, we recommend a 10-15% contingency buffer. This isn't just a safety net; it's a strategic tool to manage the hidden water damage or structural decay that often lurks behind old wall linings. By acknowledging these potential hurdles early, you remove the anxiety of the unknown.
Professional planning prevents the dreaded "U-turn" mid-construction. This happens when a homeowner chooses a fixture that doesn't align with the plumbing rough-in, forcing expensive rework. We encourage you to select your tapware, tiles, and vanities during this initial phase. Lead times for premium finishes like brushed brass or bespoke cabinetry can be significant, so securing your items early ensures the timeline remains steady. This proactive approach allows us to focus on the craftsmanship rather than chasing deliveries.
Council Approvals and NSW Building Regulations
Navigating the legal landscape is essential for any NSW homeowner. If your project involves structural alterations or exceeds a value of $5,000, you must engage a licensed builder to ensure the work is insured and compliant. You'll need to determine if your vision falls under Exempt Development or requires a Complying Development Certificate (CDC). For those in our local area, it's vital to ensure your design meets the home extension council approval Colyton guidelines. Getting these approvals right at the start protects your property's resale value and guarantees that your new sanctuary is built to last.
Determining Layout and Style
Efficiency and elegance go hand in hand. One of the smartest ways to manage costs is through the "wet wall" concept, where we centralise plumbing for the shower, toilet, and vanity on a single wall. This reduces the complexity of pipework and speeds up the installation. As you choose your aesthetic, consider how materials will perform in the Australian climate. High humidity demands surfaces that are both beautiful and resilient. Whether you're aiming for an "urban zen" retreat or a tactile, earthy space, balancing these looks with functional storage will ensure your bathroom remains a tidy, calming environment for years to come.
Phase 2: Demolition and Structural Preparation
Once the design is finalised and materials are ordered, the physical transformation begins. This stage is often the loudest and messiest, but it's where the foundation for your new sanctuary is laid. Following the bathroom renovation process step by step means we don't just "rip and tear." Instead, we perform a controlled strip-out using professional dust extraction systems. This meticulous approach ensures that the rest of your home remains a clean, livable environment while we work. We also coordinate the delivery and removal of skip bins in accordance with Colyton local regulations, ensuring that all debris is handled responsibly and efficiently.
The true value of a specialist builder is revealed during the inspection of the exposed "bones" of the room. We prioritise structural remediation, which involves a deep dive into the subfloor and wall studs to identify any historical water damage, mould, or termite activity. Many older homes in the Sydney area suffer from slow, undetected leaks that rot the timber frame over time. We believe it's vital to fix these issues at the source before any new materials are installed. If you're concerned about what might be hiding behind your current tiles, our team offers specialist bathroom renovations that focus on long-term structural integrity.
The Stripping-Out Process
Stripping a room back to its studs is about more than just making space; it's about safety and precision. In many older Sydney properties, we must remain vigilant for asbestos, which requires a strict protocol for safe, licensed removal. Once the room is bare, we evaluate the structural integrity of the floor joists and wall plates. This ensures the room can support the weight of modern premium tiles and heavy stone vanities. For more information on navigating these early stages, you can consult the Australian Government renovation guide.
Plumbing and Electrical Rough-ins
With the structure sound, we move to the rough-in phase. This is when our licensed plumbers and electricians position the new drainage lines, water points, and wiring. We ensure every outlet is level and correctly spaced for your chosen fixtures. In 2026, we're seeing a high demand for integrated technology, so this is the time we install the necessary cabling for LED mirrors, heated towel rails, and high-performance exhaust fans. Precision here is non-negotiable; even a few millimetres of error can affect the final alignment of your vanity or shower screen.
Phase 3: The Critical Barrier – Waterproofing and Bedding
If the previous phase was about restoring the bones of the room, this stage is about creating an impenetrable shield. Waterproofing is the application of a specialised liquid or sheet membrane designed to prevent moisture ingress from reaching your home's structural timber or masonry. While the tiles provide the aesthetic finish, the membrane is the only thing standing between your daily shower and a catastrophic floor failure. When navigating the bathroom renovation process step by step, we treat this as the most critical milestone for the longevity of your property.
At Bigcs Renos, we don't just meet the minimum requirements; we aim to exceed them. A failed membrane can lead to rising damp, structural rot, and toxic mould growth that is both expensive and difficult to remediate. By investing in premium materials and allowing for meticulous application, we provide a foundation that lasts decades rather than years. Our commitment to excellence is reflected in our dedication to bathroom waterproofing techniques that go beyond the basic industry expectations.
AS 3740 Standards and Certification
In Australia, all domestic wet area waterproofing must comply with the AS 3740:2021 standard. This regulation dictates specific requirements, such as waterproofing shower walls to a minimum height of 1800mm from the finished floor level. We follow a rigorous multi-coat process, ensuring each layer has sufficient drying time to bond correctly. Once the system is tested and cured, you'll receive a signed compliance certificate. This document is essential for your home insurance and provides absolute proof that the work was performed by a qualified professional.
Screeding and Surface Preparation
Before a single tile is laid, we must create a stable, sloped base known as a screed or mortar bed. We mix a precise ratio of sand and cement to ensure the floor is rock-solid and perfectly level where required. The most vital part of screeding is creating the "fall." This is a subtle gradient that ensures water flows naturally toward the floor waste rather than pooling in corners or escaping toward the bathroom door. According to current standards, this fall typically ranges between 1:80 and 1:50. We also take this time to ensure your wall surfaces are perfectly plumb, which is essential for the seamless installation of modern, large-format tiles.
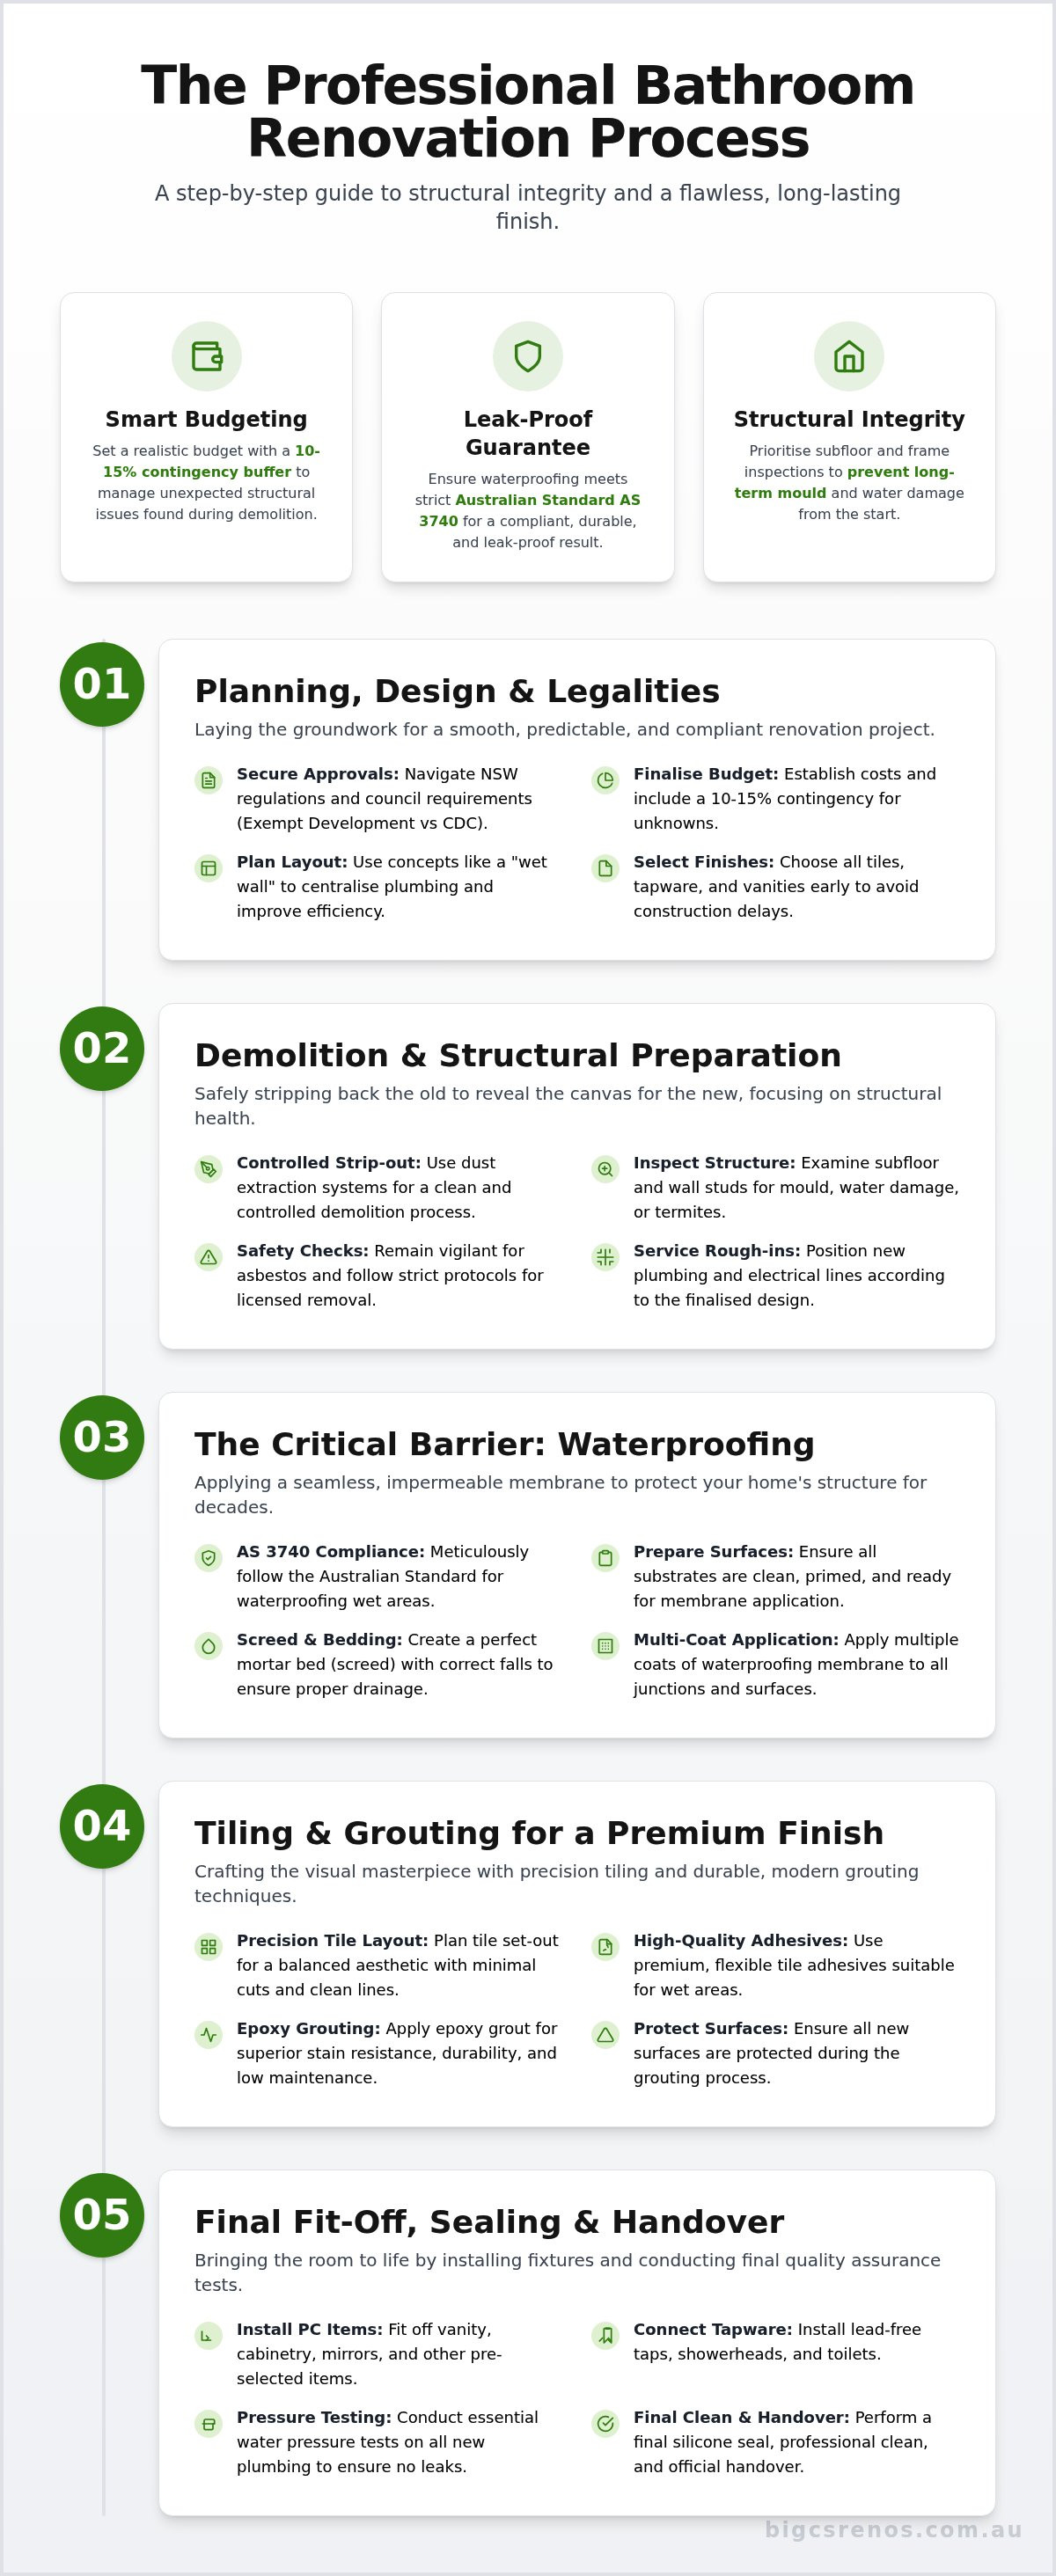
Phase 4: Tiling and Grouting for a Premium Finish
With the waterproofing membrane cured and the screed perfectly sloped, your vision finally begins to take a tangible shape. This phase is where the aesthetic transformation occurs, yet it requires just as much technical rigour as the structural work. When you follow the bathroom renovation process step by step, the tiling stage must be handled with surgical precision. It begins with a comprehensive "set out," where we calculate exactly how every tile will sit on the floor and walls. This careful planning avoids awkward sliver cuts in prominent areas, ensuring your layout looks balanced and deliberate from the moment you step through the door.
Our team uses high-quality adhesives and advanced laser levelling systems to lay each piece with absolute accuracy. We prioritise mitred edges over traditional plastic trims; this involves cutting the tiles at a precise 45-degree angle where they meet at external corners. The result is a sleek, continuous finish that defines a truly premium renovation. For those searching for bathroom renovations near me, our local expertise ensures that every joint is perfectly aligned, regardless of the room's original quirks.
Professional Tiling Techniques
The choice of material significantly impacts the room's durability. We often recommend porcelain over ceramic for its superior density and resistance to moisture. To ensure a flawless surface, we employ mechanical levelling systems that eliminate "lippage," the slight height difference between adjacent tiles that can ruin the look of large-format slabs. These tools, combined with our decades of experience, guarantee a floor that is as smooth as it is beautiful. This meticulous approach ensures your new tiles aren't just a surface, but a lasting asset for your home.
Epoxy Grouting vs. Traditional Grout
The final step in this phase is the application of grout, and here, the choice of product is vital. While traditional cement-based grout is common, we specialise in epoxy grouting. Unlike porous cement, epoxy is a resin-based product that is completely waterproof and virtually stain-proof. It's technically difficult to apply because it sets quickly and requires a meticulous cleaning process, but the results are incomparable. Your grout lines won't absorb soap scum or mould, meaning they'll retain their original colour for years to come. If you're ready for a finish that stands the test of time, explore our professional tiling and epoxy grouting services today.
Phase 5: Final Fit-off, Sealing, and Handover
The final phase of the bathroom renovation process step by step is where the dust settles and your new sanctuary is finally revealed. This stage is about the fine details that transform a tiled room into a functional, luxury space. We begin by installing the heavy hitters: the vanity unit, the toilet suite, and your custom shower screens. Precision remains paramount during this stage. A vanity that isn't perfectly level or a shower screen with a slight misalignment can compromise both the aesthetic and the water-tight integrity of the room.
Once the primary fixtures are in place, our licensed plumbers return for the final fit-off. They connect your chosen tapware and conduct a comprehensive pressure test on all new lines. This is a non-negotiable step in 2026, ensuring that every connection is bone-dry and compliant with the latest mandatory lead-free plumbing standards. We then apply high-grade, mould-resistant silicone to all internal corners and junctions. This flexible seal allows for the minor natural movement of your home without cracking, providing a final line of defence against moisture. A professional deep clean follows, removing every trace of grout haze to let your new finishes truly shine.
Installing Fixtures and Cabinetry
We take immense pride in the secure anchoring of your cabinetry. A floating vanity requires expert structural support to ensure it remains stable for decades of daily use. We also focus on the placement of mirrors and lighting, which are essential for enhancing the sense of space and providing functional illumination. Accessories like towel rails and toilet roll holders are mounted directly into wall studs wherever possible. This meticulous approach prevents the frustration of loose fittings later on, ensuring every element feels solid and high-end.
The Final Inspection and Maintenance
The journey concludes with a detailed walkthrough. We'll examine every joint and finish together to ensure the project meets our rigorous standards of excellence. You won't just receive a beautiful room; we'll also hand over your final warranties and that all-important waterproofing compliance certificate for your records. To help you preserve the beauty of your investment, we provide a tailored maintenance guide. This includes specific tips on caring for your epoxy grout and premium tapware finishes, ensuring your bathroom remains a source of pride and relaxation for the long term.
Ready to Create Your Personal Sanctuary?
Navigating the bathroom renovation process step by step requires more than just a vision for beautiful tiles; it demands a commitment to structural excellence and technical precision. By prioritising meticulous waterproofing and addressing hidden structural issues during the early phases, you ensure your new space remains a leak-proof sanctuary for decades to come. Whether you are dreaming of a tactile urban zen retreat or a sleek modern masterpiece, the success of your project lies in the invisible details hidden behind your premium finishes.
With over 15 years of Sydney renovation experience, our family-owned team understands the unique requirements of local home structures. As licensed and insured waterproofing specialists, we take immense pride in delivering results that exceed Australian standards. We're here to guide you through every decision, from initial planning to that final, perfect bead of silicone. Start Your Colyton Bathroom Transformation with Bigcs Renos Today and experience the confidence of working with local experts who value your home as much as you do. Your dream bathroom is closer than you think.
Frequently Asked Questions
How long does a typical bathroom renovation take in Australia?
A full gut renovation typically takes between 3 and 4 weeks to complete in 2026. This timeline accounts for the sequential nature of the bathroom renovation process step by step, allowing for essential curing times for screeds and waterproofing membranes. While cosmetic updates might be faster, a professional structural overhaul requires this window to ensure every stage meets Australian Standards.
Do I need to move out of my house during the renovation process?
You don't necessarily need to move out, but you should prepare for significant disruption if you only have one bathroom. The demolition and tiling phases are particularly loud and dusty. We use professional dust extraction to protect the rest of your home, but most families find it easier to stay elsewhere for the peak two weeks of construction when the room is completely out of action.
What is the most expensive part of a bathroom renovation?
Labour costs for licensed trades and high-end finishes like porcelain tiles usually represent the largest portion of the budget. Specifically, the invisible work of plumbing, electrical rough-ins, and waterproofing accounts for a significant investment. This ensures the structural integrity of your home, which is far more valuable than the surface aesthetics alone.
Can I change the layout of my bathroom if it is on a concrete slab?
Yes, you can change the layout on a concrete slab, though it involves more intensive labour such as core drilling or trenching to relocate drainage lines. While keeping the original plumbing points is more cost-effective, a complete redesign is often worth the effort to achieve a more functional, modern floor plan that better suits your daily needs.
Why is waterproofing certification so important in NSW?
A signed waterproofing compliance certificate is a legal requirement in NSW for all domestic wet area works. It provides essential proof for your home insurance that the work meets AS 3740 standards. Without this document, you may face significant hurdles during property resale or if you ever need to make a claim related to water damage or mould remediation.
Is epoxy grout worth the extra cost for a residential bathroom?
Epoxy grout is absolutely worth the investment for homeowners seeking a low-maintenance, long-lasting finish. Unlike traditional porous grout, it's completely waterproof and resistant to stains and mould. This means your grout lines won't discolour or crumble over time, which significantly extends the life of your tiling and reduces your weekly cleaning workload.
What should I do if we find asbestos during the demolition phase?
If asbestos is suspected during demolition, all work must stop immediately to ensure the safety of the household and the tradespeople. We follow a strict protocol that involves testing and engaging a licensed asbestos removalist to safely clear the site. Once the hazardous material is professionally removed and a clearance certificate is issued, the bathroom renovation process step by step can resume safely.
Do I need council approval for a standard bathroom makeover in Colyton?
You generally don't need council approval for a standard makeover that doesn't involve structural changes or extensions. However, if you're moving structural walls or adding a completely new bathroom to the property, you may require a Complying Development Certificate (CDC). We always recommend checking the specific local planning guidelines for Colyton before starting any major structural works.


